XEBEC Brush™ Crosshole
Ideal for deburring, polishing and cutter mark removal on inner diameter and counterbored part
Applicable equipment
The tool can be mounted on an equipment which can control the rotation speed. The tool must be rotated over
( 6500 min-1).

Machining center

Combined lathe

Special machine

Robot

Drilling machine

Rotary tool
(electric)
Brushes

Precautions for use
The Brush will break off when:
○ machined beyond the maximum rotational speed
○ used with a pneumatic tool
○ rotated outside the cylinder (outside workpiece)
In the following cases, the Brush may break off,
○ Off-center cross hole and angled cross hole
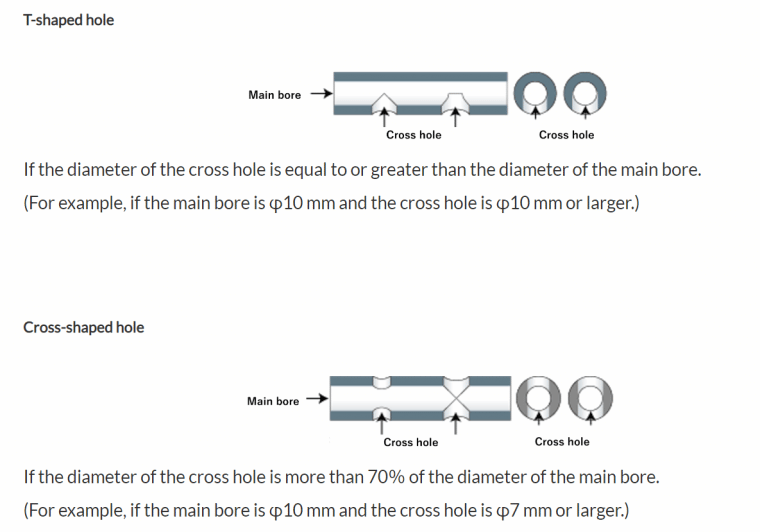
○ T-shaped hole: If the cross hole diameter is 100% of the main bore diameter or more.
○ Cross-shaped hole: If the cross hole diameter is 70% of the main bore diameter or more.

Usage instructions
Brush must be inserted from a main bore.
Burrs cannot be removed in case the brush is inserted from a secondary hole.

Precautions for use
■ Processing beyond the maximum rotational speed may cause brush damage.
■ Process outside the cylinder (outside workpiece) may cause brush damage.
■ This tool is not suitable for off-center hole or oblique hole.
■ In the following cases, brush damage may occur.

How to select Brush color
Refer to the chart below and select the brush color based on the workpiece material, burr thickness and surface roughness.

– HRSA (heat resistant super alloy)
How to select Brush size
Select Brush size based on main hole diameter (brush insertion hole).
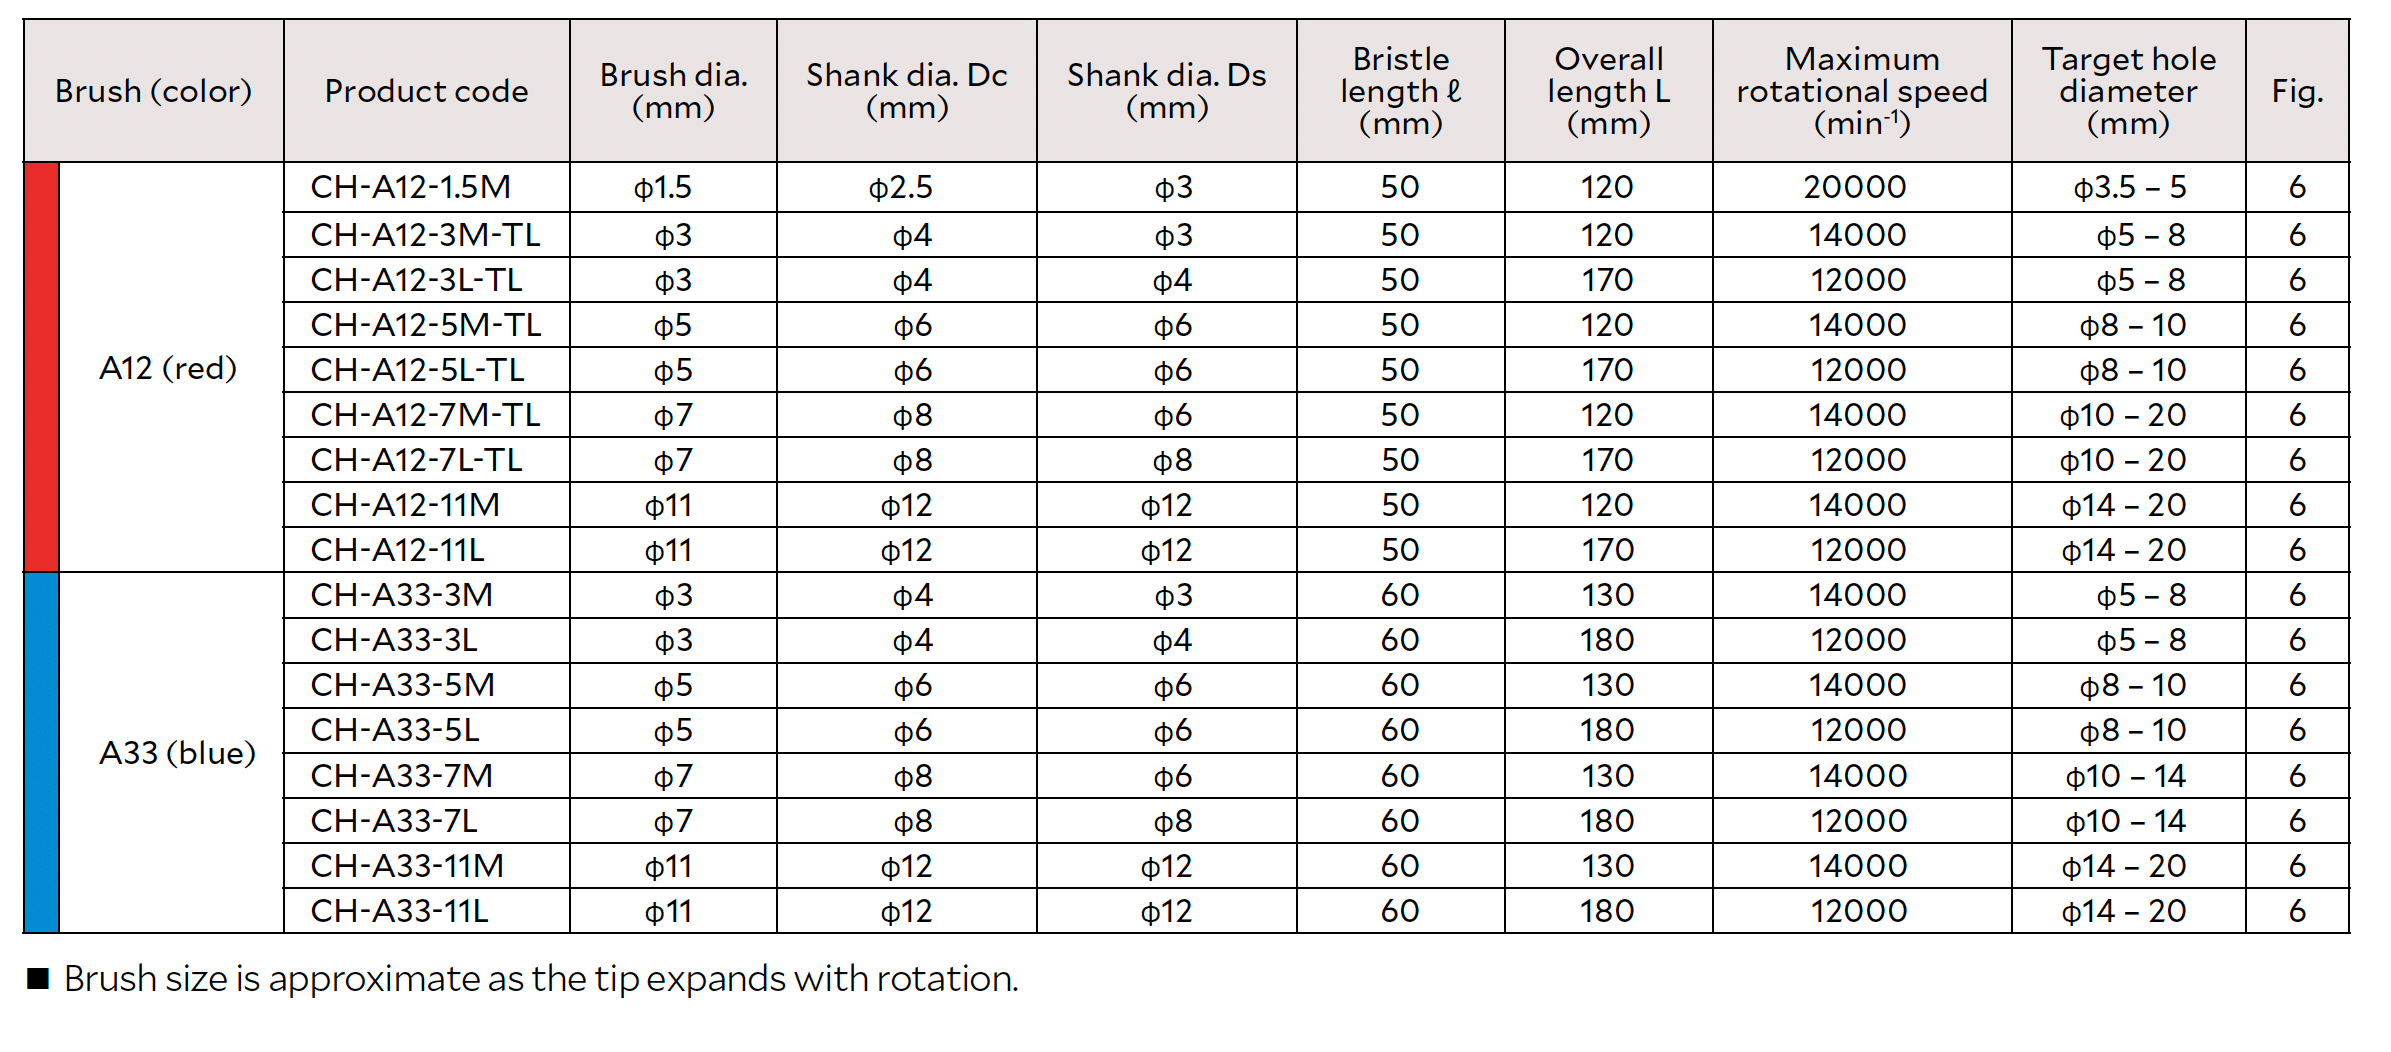
Each Brush has 2 different length (M and L) except for φ1.5 brush diameter.
For a bore depth over 140mm, Extra-Long type is available as a customized item.
For effective use

1. Insert the brush while not in motion.
*If you rotate the brush outside the cylinder, the bristles may be damaged or scattered and may cause injury to the operator.
2. Rotate the tool past the cross-hole
*Consistent edge quality can be obtained by rotating the tool in both CW and CCW direction.
3. Process while pulling the brush back.
*Pulling the brush back past the cross holes prevents burrs from being laid flat against the interior surface of the cylinder.
4. Process while pushing the brush forward.
*Pushing the brush forward ensures that burrs remaining upward are removed.
5. Stop the brush rotation.
6. Remove the brush while it is at rest.
Processing conditions
Recommended rotational speed and maximum rotational speed
| Product code | Recommended rotational speed | Maximum rotational speed |
| CH-A12-1.5M | 9000~11000min-1 | 20000min-1 |
| CH-A12-3M | 7000~10000min-1 | 14000min-1 |
| CH-A12-3L | 12000min-1 | |
| CH-A12-5M | 8000~10000min-1 | 14000min-1 |
| CH-A12-5L | 12000min-1 | |
| CH-A12-7M | 7000~9000min-1 | 14000min-1 |
| CH-A12-7L | 12000min-1 | |
| CH-A12-11M | 6000~7500min-1 | 14000min-1 |
| CH-A12-11L | 12000min-1 |
| Product code | Recommended rotational speed | Maximum rotational speed |
| CH-A33-3M | 7500~9000min-1 | 14000min-1 |
| CH-A33-3L | 12000min-1 | |
| CH-A33-5M | 7500~8000min-1 | 14000min-1 |
| CH-A33-5L | 12000min-1 | |
| CH-A33-7M | 6500~8000min-1 | 14000min-1 |
| CH-A33-7L | 12000min-1 | |
| CH-A33-11M | 14000min-1 | |
| CH-A33-11L | 12000min-1 |
Feed rate and rotational direction
Feed rate: 300mm/min.
Rotational direction: A uniform deburring and edge quality can be achieved by rotating the tool in both clockwise and counter-clockwise directions.
Recommended rotational speed
Recommended rotational speed is different depending on brush diameter.
See the recommended rotational speed and the target hole diameter shown below.
The continuous line (-) represents the recommended rotational speed.
The dotted line (- – -) represents the rotational speed when the brush is worn down 10mm.
You can continue to use the tool by adjusting (i.e. increasing) the rotational speed according to the wear amount.
CH-A12-1.5M(φ1.5mm Red brush)
-1-1.jpeg)
【Target hole diameter】φ3.5~φ5mm
【Recommended rotational speed】9000~11000min-1
CH-A12-5M/CH-A12-5L(φ5mm Red brush)
.jpeg)
【Target hole diameter】φ8~φ10mm
【Recommended rotational speed】8000~10000min-1
CH-A12-11M / CH-A12-11L(φ11mm Red brush)
.jpeg)
【Target hole diameter】φ14~φ20mm
【Recommended rotational speed】6000~7500min-1
CH-A33-5M/CH-A33-5L(φ5mm Blue brush)
-1.jpeg)
【Target hole diameter】φ8~φ10mm
【Recommended rotational speed】7500~8000min-1
CH-A33-11M/CH-A33-11L(φ11mm Blue brush)
.jpeg)
【Target hole diameter】φ14~φ20mm
【Recommended rotational speed】6500~8000min-1
CH-A12-3M / CH-A12-3L(φ3mm Red brush)
.jpeg)
【Target hole diameter】φ5~φ8mm
【Recommended rotational speed】7000~10000min-1
CH-A12-7M/CH-A12-7L(φ7mm Red brush)
.jpeg)
【Target hole diameter】φ10~20mm
【Recommended rotational speed】7000~9000min-1
CH-A33-3M / CH-A33-3L(φ3mm Blue brush)
.jpeg)
【Target hole diameter】φ5~φ8mm
【Recommended rotational speed】7500~9000min-1
CH-A33-7M/CH-A33-7L(φ7mm Blue brush)
-1.jpeg)
【Target hole diameter】φ10~φ14mm
【Recommended rotational speed】6500~8000min-1
How to adjust
If burrs remain
1. Increase the rotational speed to the maximum with increment of 1,000min-1.
2. Increase the number of pass.
If the workpiece cannot be deburred even by the above-mentioned procedures, the machining condition may be incorrect or the burr size is too large.
Change the brush with higher grinding power.
The grinding power of the Brush: Blue > Red
To extend tool life
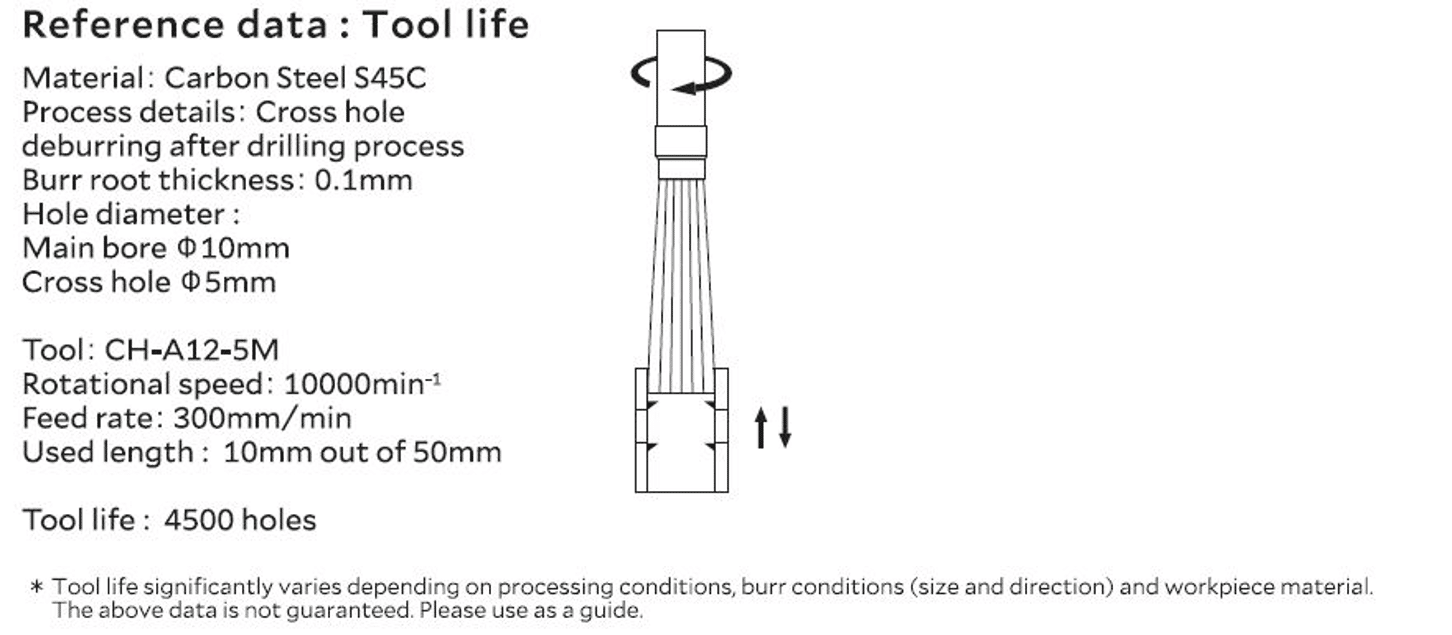
Decrease the rotational speed in 10% increments or increase the feed rate in 10% increments

Maintenance
Truing
In case the Brush is deformed, you can form the tips of the brush using a diamond disc blade.
Drilling machine or lathe can be used for forming.
Wrapping the Brush with tape makes truing easier by preventing the bristles from spreading out.


Truing with a lathe
To cut off the Brush, cut from the side of the Brush using a diamond disc blade.
Brush Positioning
Set the depth of cut in a place as the Brush tips become flat.

Operation safety measures
Always wear protective goggles, gloves and masks when using the tool.
Wear long sleeved clothing, and close the cuffs and outerwear sleeves to minimize skin exposure.
Cutting particles and burrs may scatter within an area around the work as the brush rotates. Please stay clear of this area.
The area around your work is hazardous in case flying pieces of fiber rods from the tools and grinding powder may scatter, enclose your working area to prevent other people entering, or have the people surrounding your work area wear the protective equipment as well.
Follow the precautions for use and operation safety measures without fail.
If you fail to observe them, there are following risks.
• A tool or a part of tool may crack, drop off, distort or break.
• Broken pieces of a tool or cutting particles may stick into your skin, or at worst stick into yours eyes, causing loss of sight.
• Dust generated by processing may bring up skin irritancy or allergy.
